As we look at the plays of the 2011 season that had the most impact, there are very few that come to mind that demonstrate the ability to defy the X's and O's like this particular play in Week 3 against the Washington Redskins.
To set up a few details, we must recall a couple things. First, the Cowboys have been dealing with all manor of injuries to their passing game. Miles Austin is not playing. Dez Bryant is attempting to return after missing the San Francisco game in Week 2. Laurent Robinson is making his Cowboys debut in this game after rushing to learn the playbook. And, maybe most importantly, Tony Romo is playing despite reports all week that it would be pretty difficult to play in this Monday Night game with his ribs and punctured lung preventing his ability to get comfortable. Reports all week about wearing special protection and sleeping in a chair at night were all over the news and therefore on the mind of all viewers.
Second, the game had been an absolute war. Both defenses were winning the battles most of the way. It was a very physical game, and from a Cowboys' perspective, a very frustrating one. The drives that were not sabotaged by poor execution by the offense was destroyed by a big night from a talented Redskins' defense. Laron Landry was destroying quite a few plays and the bookends of Brian Orakpo and Ryan Kerrigan were showing that they will be a force to be reckoned with for years to come.
Seldom do we have a game where there are 10 scores, and yet neither team breaks 20 points, but that happened in this divisional battle. The Cowboys surrendered the only touchdown of the game late in the 3rd Quarter as Tim Hightower caught a 1-yard Touchdown pass from Rex Grossman and the game went to the 4th Quarter with the visiting Redskins ahead, 16-12.
The 4th Quarter continued the theme of frustrating offense. The Cowboys could just not get into the end zone. And, despite kicking another field goal, would still trail 16-15 when they stopped the Redskins and forced a punt with under 4 minutes to play.
If Dallas was going to salvage this battle, they would have to generate points on this final drive from their own 14 yard line.
2 passes, 7 yards to Witten and 20 yards to Kevin Ogletree on a skinny post would get the ball to the 41 yard line.
On 1st Down from the 41, Jim Haslett and the Redskins are showing a Cover 0 blitz. This coverage simply means that they are bringing every available man. The Cowboys have 3 WR which are all locked in man coverage with their DB. Otherwise, all 8 Redskins defenders are lined up across the line and showing that they are all coming to get Romo. The only exception would be on the two players who are accounting for Felix Jones and Jason Witten. If they stay in to block, they are rushing. But, if Witten releases into a route, then the defender will go with. But, usually, when a team shows Cover 0, the QB then audibles to make sure his players stay home to pass protect in a situation like this.
We can only assume that Romo was attempting to change his play at the line to make that adjustment, but we will never know. Because as he is talking to Witten and his receivers, Phil Costa gets antsy and snaps the ball past Romo with his 3rd errant shotgun snap of the evening. Costa was having an awful night, which only added to the strife that existed in Cowboys' land after what appeared to be the premature release of veteran center, Andre Gurode only 2 weeks prior.
The ball fired past Romo and luckily, the ball bounced perfectly to Romo as Ryan Kerrigan is fighting to scoop the ball up as well. Felix Jones did a nice job of getting a shoulder into Kerrigan or surely the large linebacker was going to knock the ball free. The Cowboys lost 11 yards on the miscue, and Costa would get an earful from Romo, but they would retain possession.
2nd and 21. Again, the Redskins show Cover 0. Again, the Cowboys put on a slide protection and try to throw a quick slant to Robinson. Incomplete, but even if it was caught, it was only going for a yard or two. With 2 timeouts, it is possible that a punt and a stop could leave the Cowboys a desperation chance after a punt, but quite likely, the game would come down to the next play.
3rd and 21. The league conversion rate for 3rd and more than 10 yards is under 20%. The NFL average for 3rd and 20 is quite minute, and last year, the Cowboys were a very poor 3rd Down team in the 1st half of the season. Now, they faced a situation where they had to try to convert a 3rd and very long.
Let's consider the Redskins situation. They could assume that the Cowboys might consider this a 2 play situation to get 21 yards, but even so, if ever there was a spot where a very conservative approach on defense might be called for, it would seem this was it. The Cowboys passing attack had not shown - especially with the group of receivers they have available that they were potent. And we should all understand that Cover 0 blitzes have been phased out in the NFL more and more as the years have gone along because of the fact that they are too risky for defenses. Instead, the fire-zone blitzes are the new evolution, because those allow for chaos in pass protection, but still allow a 3-3 zone behind it. any blitz that allows a 6 man coverage is still tactically sound.
But, a cover 0 blitz? Sending 8 and the other 3 defenders are in man-to-man. Any bust in coverage is going to be a big play that will often end in a Touchdown. But, it worked on 1st and 2nd down. So maybe, Haslett thought his defense could do it one more time.
The Play: 3rd and 21 from Dallas 30 yard line - 2:20 left 4th Quarter - 12 Personnel (1RB, 2TE, 2WR)
The Cowboys bring on John Phillips for Robinson and Tashard Choice in for Felix Jones.
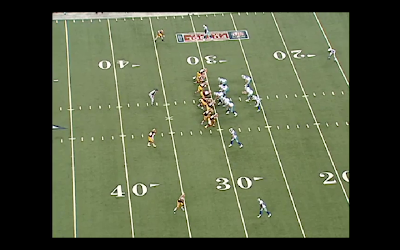
Picture #1 (Click on any picture to enlarge) shows that Romo sees the Redskins again in that same Cover 0 look. He has to believe that they are simply showing this look and will fall into something more conservative on 3rd and 21. The odds of a team blitzing out of Cover 0 3 times in a row with the game on the line just seems unlikely. Witten is in the slot left with Ogletree wide left. This is also the spot where he occupied on the Jesse Holley TD the week before.
#1

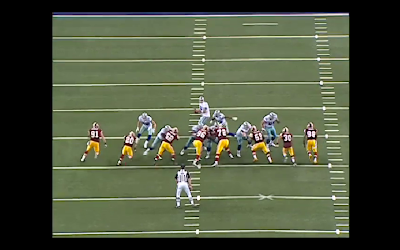
I encourage you to click on picture #2. It is clear that here, Ogletree is on a 10 yard sideline route and Witten is on his normal 10 yard hook. Both of these routes suggest that Cowboys are not going for 21 yards, they are running routes that can A) happen quick enough against Cover 0 blitzes and B) cut the mountain in half to set up a 4th and 10. Dez Bryant, as we saw in picture #1 is being played off by DeAngelo Hall. Hall is giving him space and the Cowboys have him set up for a quick pass from Romo (an obvious counter to a blitz) and there he will have a chance to get a chunk of yardage, especially if he can get Hall to miss on his tackle. Now, look at Romo. Romo is waving Bryant down the field with his left arm.
#2

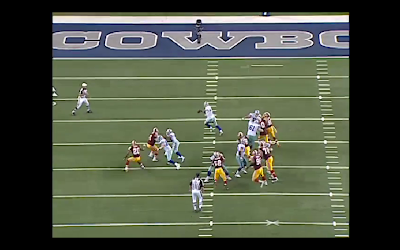
In Picture #3, we see a few things that make this play amazing. First, Witten and Ogletree are eliminated from the play when Romo starts back-pedaling to his right. He knows that this play is now about one receiver and one chance. When he made this decision is open for debate, but at some juncture, Dez and Romo had the same idea. Go deep. The key for Dez is simple, give Romo the inside path. If Bryant can cross the face of Hall and have the entire open side of the field to work with, this play has a chance. Meanwhile, you can see London Fletcher free and within 5 yards of Romo. Tony now must let the ball go and give Dez a chance.
#3

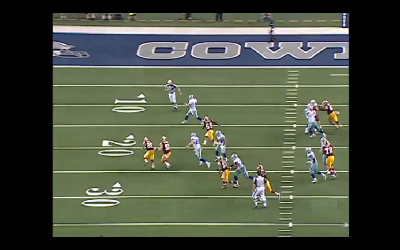
And by picture #4, it is all over. Bryant had inside leverage and was able to keep Hall behind him and make the catch. Tack on a few more yards in the struggle and 15 more on a Hall face mask, and the Cowboys have not only converted a 3rd and 21, but also took the ball all the way to the Washington 25. It was an amazing 45 yard gain in all.
#4

Now, let's look from the End Zone. Picture #5 shows us that the Redskins lined up their Cover 0 blitz with a nice adjustment. Instead of having the two DBs as the most outside rushers, they have Orakpo (98) and Kerrigan (91) as the outsides. What this means is a difficult block for the RB if the Cowboys do what they will most certainly do, slide protection.
#5

Slide protection is how you try to block 8 players with only 7 blockers. It is trying to make a wall with your offensive line. In this case, they slide left. Which means, Free gets the flank with Orakpo. Then everyone takes the guy to his left. Of course, numbers-wise, this will not totally work out, so Phillips (lined up to Romo's right) will take the 7th man, OJ Atogwe (20) and Tashard Choice is going to try to get all the way across Romo and block the 8th man, Kerrigan (91). This, of course, is a mismatch.
#6

In Picture #7, you can see the man who comes free is Fletcher (59). This happens, because on the slide, Bill Nagy was trying to get Fletcher and Landry. This is why Romo starts backpedaling to his right, because he knows that math isn't going to hold up. Fletcher is running free and Romo is still backpedaling to buy Dez just a few more blinks of the eye to get inside leverage on Hall.
#7

Now, Romo is all the way back at his own 15, 15 full yards behind the line of scrimmage. Fletcher is closing in fast, so Romo is going to take a shot in the mouth if he doesn't release the ball now. But, since there is no safety in center field, Romo can simply lead Bryant and Hall can only hope the pass is off.
#8

Finally, the ball is now in the air. As you can see, DeAngelo Hall is well out of position here. And the 30 yard pass play on 3rd and 21 is about to be completed.
#9

It is only a play that works if the Redskins gamble on defense. The issue I would have with Haslett is that given his circumstances, his risk/reward meters seemed way out of balance. When expecting a long pass, you surely want to make sure you are minding center field. Otherwise, you are basing the entire game on the idea that you can get Romo with this blitz. And when you have the lead in the game, that is just not smart football.
Below, you can see the entire play off the TV copy and check it out for yourself. It was a great job by Romo again for figuring out a way to ignore the Xs and Os of the play call and figure it out as it is all happening. This is the upside of the gunslinger after we saw the downside with the Jets game. Also, a throw that is in open space to lead a receiver will come up again when Romo and Miles Austin could have clinched the Giants game in December - a play that will live in infamy.
Regardless, this was a very important play and one that shows that every once in a while, your opponent does you a favor. And their coaches make poor decisions, too.
11 for '11 series:
1. The Revis Interception
2. The Home Run to Holley

1 comment:
this is greatness. thanks for posting it.
Post a Comment